Happy Fall, everyone!
Last week, we talked about our new series of weighted structural parts. This week, we’re unveiling a new feature within our Paint Tool – textures! This feature has an interesting origin story, as it was an unexpected result from our initial prototyping for a weight system. But first we need to explain how customizable robot textures have their foundation in how 3D objects in RoboCo are set up in general.
Shape, Color, and Texture
The color and texture of 3D objects in RoboCo are handled a little differently than what you might be familiar with in other games. This is an oversimplification compared to what’s happening under the hood, but in terms of the player-facing experience, you could think of RoboCo’s 3D objects as mainly having three visual layers: the first layer is the wireframe mesh, which you can think of as defining the shape of the object; let’s say, a restaurant booth chair. The second “layer” is the vertex color, which you can think of as a color assigned to different regions on the object; red on the cushion, brown on the base. the third layer is optional. If we wish, we can assign to a region a tiling texture that will be overlayed on top of the colors: a fabric pattern on the cushion, wood grain on the base.
To keep RoboCo’s art simple, stylized, and charming, we use textures sparingly, often to communicate certain real-world materials. For the most part, metal and plastic objects in RoboCo don’t have a texture (like the sandwich dispenser in Sandwich Server) while objects made of fabric, wood, carpet, etc. do use textures (like the restaurant booth chair).

Two Roads Diverged and We Traveled Both
We haven’t often talked about our missteps on this blog, but failing and trying again is an inherent part of creative problem solving, including in game development.
Before we started working on our new system of weighted structural parts a couple months back, we already had a design concept and wireframes that we had been iterating on while we worked on other features, as we always do our best to think ahead about how various future features might work before we put one of them on the development roadmap. In this case, we wanted to have weight be associated with materials like plastic (lightweight), aluminum (medium), and steel (heavy). In our concepts, it seemed plausible, but we were probably too preoccupied with figuring out the user interface and not enough with validating our core idea. Once we began prototyping, we had to admit that a flaw in our plan was more significant than we anticipated.
We thought we might get away with subtle textures like brushed aluminum vs. galvanized steel to distinguish materials, but the more look development we did, the more it felt like we were off track using textures as the heart of our materials / weight system. RoboCo has such an established visual language for metal as untextured that we couldn’t visualize differences like aluminum and steel with subtle textures without it feeling like your robot was made of, at the very least, a different sort of metal than the other metal in the environment. We also became concerned that some players would choose a certain weight block just because they wanted no texture or a specific texture, and nothing to do with the weight at all.
During this process we talked about our other visual options for communicating materials with different weights, and our existing theme color system emerged as the aesthetically-best-looking strategy. In fact, the Tertiary color in our themes had mainly been used for our placeholder heavy block for several years, almost as if it knew this day would come. You can see how the theme-colored weight blocks turned out in last week’s blog and we were very pleased with this new solution.
In the meantime, we had already done much of the work needed to allow the player to edit the textures of structural blocks on their robot. So now, we had a core system implemented, plus some textures we had experimented with on structural robot parts that we liked. But we needed a new place to use these in the game… so we decided to add control over these textures to the Paint Tool. This rescued some work from our little detour, didn’t feel disruptive like it did when textures were a required side effect of weight, and added a nice little customization option!
How Do I Add Textures to My Robot?
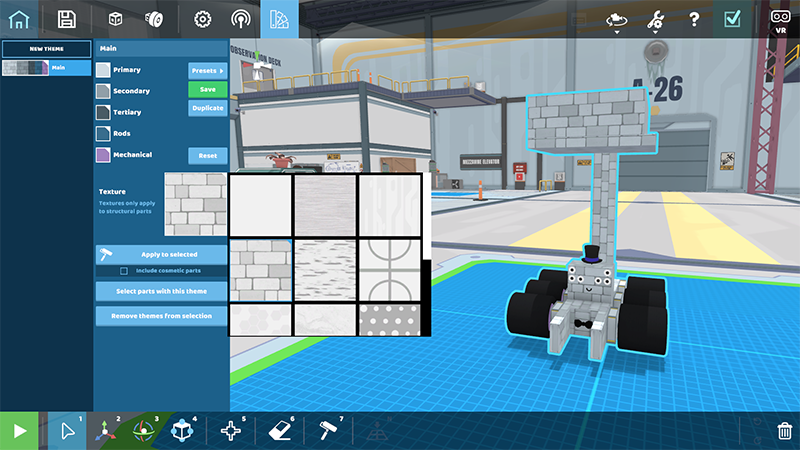
To access textures via the Paint Theme Menu, simply click on the Paint Themes Menu at the top of the RoboCo UI. Once there, you’ll see a large square labeled “Texture” underneath the different paint categories.

Click inside that square to choose from a slew of texture options. Keep in mind that these textures only apply to structural parts (at least for now), so you won’t be able to change the textures of other parts like motors, gears, wheels, cosmetics, etc.
For those that prefer a more hands-on approach to painting, we’ve also added a texture mode to the Paint Tool. To use it, click on the Paint Tool at the bottom of the RoboCo UI and select “Texture Mode.” Clicking within the box to the left of the tool, much like the box in the Paint Themes Menu, will allow you to select the texture you want and then paint it directly onto the structural parts of your robot.
We’re still testing the various textures for how they look, wrap, etc. but we expect to have a selection of several at launch. Some current textures include a marble texture, a brick texture, a polka dot texture, and a flannel texture! In fact, you may have seen this flannel texture before on social media as it was used to give our imposter robot a more…human look!
While we didn’t originally intend for robot textures to be a launch feature, it was a nice surprise to add yet another layer of visual customization to our game. We’re excited to see how players use this feature to make even more realistic or wackier robots!
And that’s it for this week’s devblog! Next week, we’ve got some new cosmetics as well as a brand new sound feature to tease!
For the latest news on RoboCo, follow us on Twitter, YouTube, Facebook, Instagram, and TikTok! You can also connect with other community members and us by joining our official Discord and Reddit!
Don’t forget to add RoboCo to your Steam Wishlist!